ECE 4160 Fast Robots

Raphael Fortuna


Lab reports made by Raphael Fortuna @ rafCodes Hosted on GitHub Pages — Theme by mattgraham

Home

Lab 12: Path Planning and Execution

Summary

In this lab, I worked with Jueun and Tiantian to have the robot path plan and drive around the map using PID, Kalman Filter, and global path planning. There were nine different waypoints given to us, and shown below, and our goal was to hit each waypoint as we drove through the map as quickly and accurately as possible.
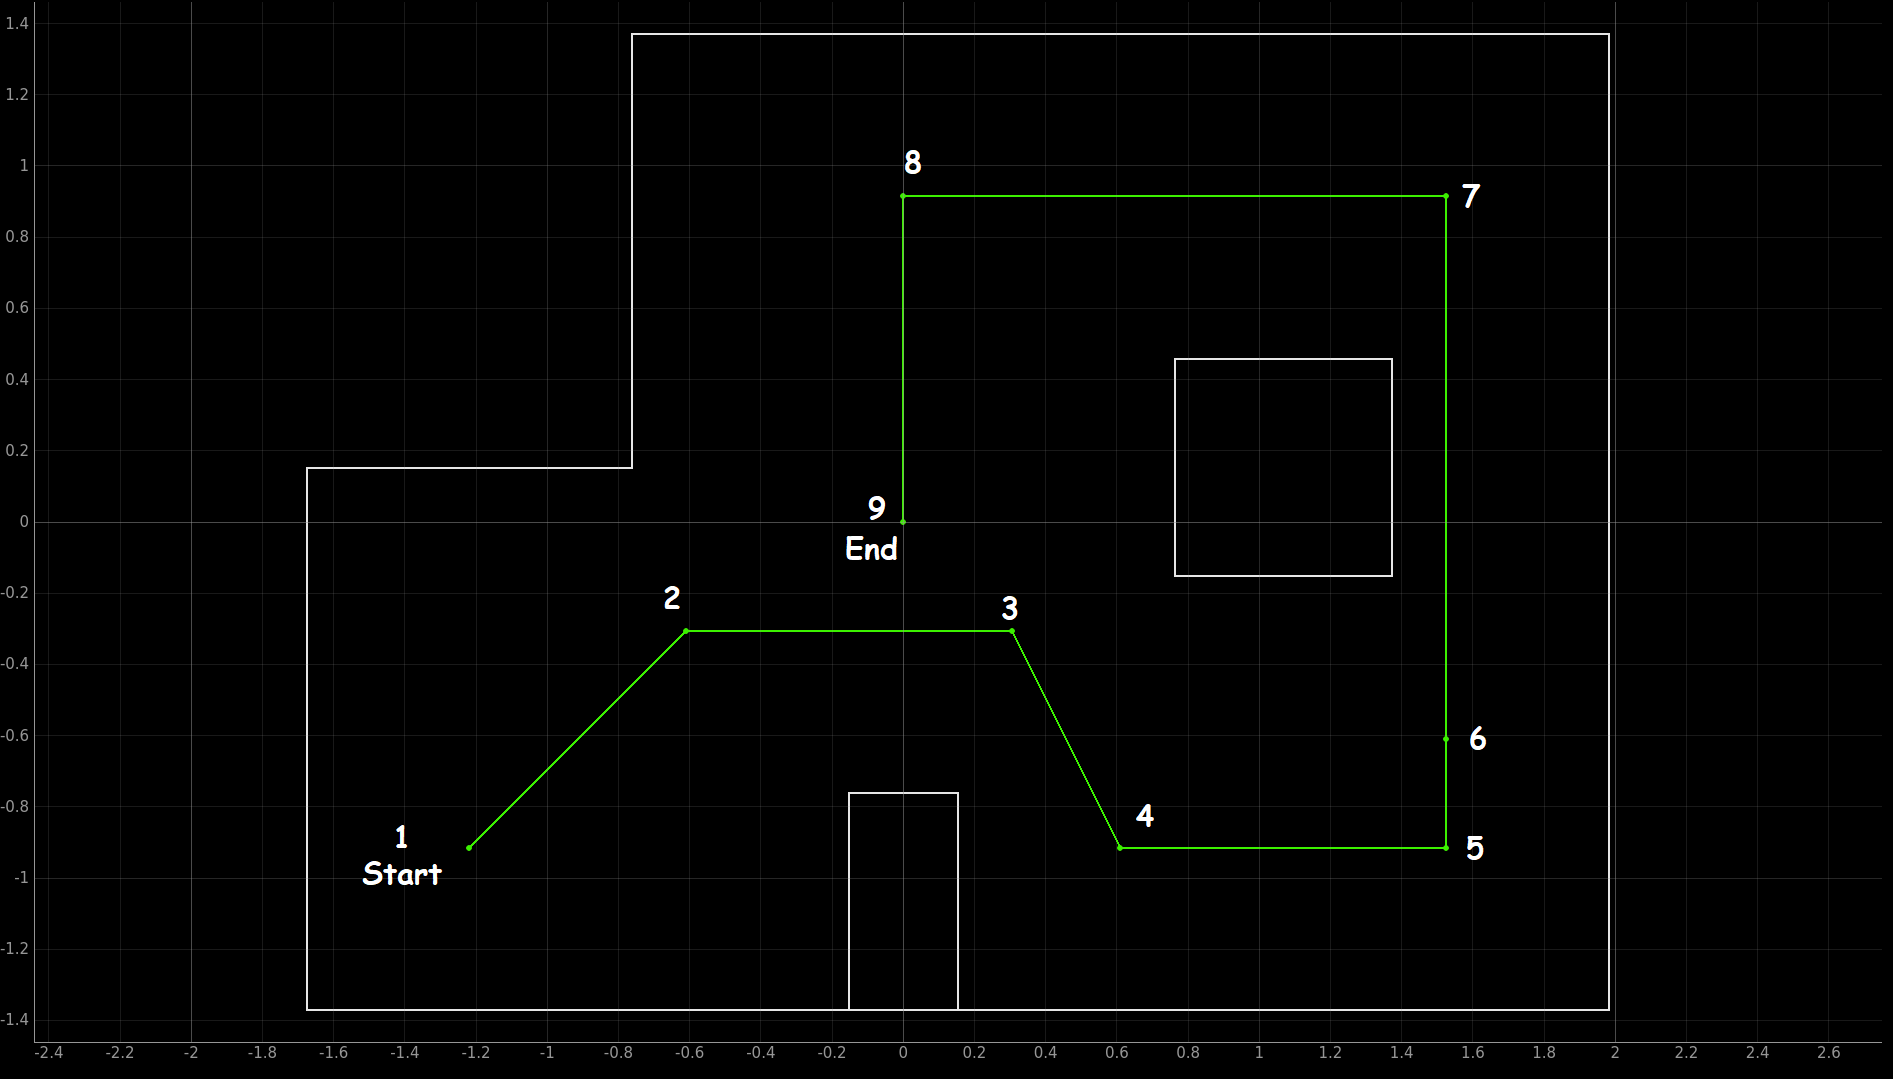
  • 1. (-4, -3) start
  • 2. (-2, -1)
  • 3. (1, -1)
  • 4. (2, -3)
  • 5. (5, -3)
  • 6. (5, -2)
  • 7. (5, 3)
  • 8. (0, 3)
  • 9. (0, 0) end

Here is a picture of the map we were given from the lab 12 instructions annotated with the waypoint numbers:

Map of where the robot need to drive

We initially were going to use localization and the Bayes Filter to localize every time the robot got moved from one waypoint to the next to correct itself or move back to the waypoint if it was missed. However, we had an infrequent runtime error that was causing localization to be unstable and sometimes fail, so we decided to not use localization given our time constraints.

We also had considered combining this with the magnetometer to correct heading errors, as that was the most inaccurate part of localization. We would update and correct our heading once our robot was completely stopped. This is because the motors’ magnetic field interferes with that of the magnetometer, and so they must not be running to measure the change.

We decided to do global path planning with the Python code on the laptop and send the robot the required commands every few seconds, with no data being sent back to the laptop. We would have the robot use feedback control when driving forward and when turning using the ToF and gyroscope respectively. We chose this because this would allow us to do the planning and understand the map – as well as also choose the path – on the laptop while the robot would execute the commands to turn and move forward with feedback control to be more precise with its movements and not have to handle all that planning.

Team Collaboration

We used Jueun’s robot, Kalman Filter, and PID forward control with the ToF. We used Tiantian’s PID turning control with the IMU. We used Raphael’s global path planning code for controlling the robot.

The Robot System

Our final system consisted of the global path planner running in Python, a PID controller using the gyroscope for turning, a PID controller using a Kalman Filter for driving forward, and a PID controller for driving forward a set distance from a wall. The difference in these last two commands is one lets us have the robot drive forward 1 foot, while the other allows us to have the robot drive forward until it is 2 feet from a wall.

Doing this allowed us to use the walls to correct any drifting the car might have had while moving. When doing this while driving to the fourth and fifth points, we were able to have the robot realign itself by doing this, as can be seen in our video later below.

Here is a diagram that explains how our processes worked:

Process diagram

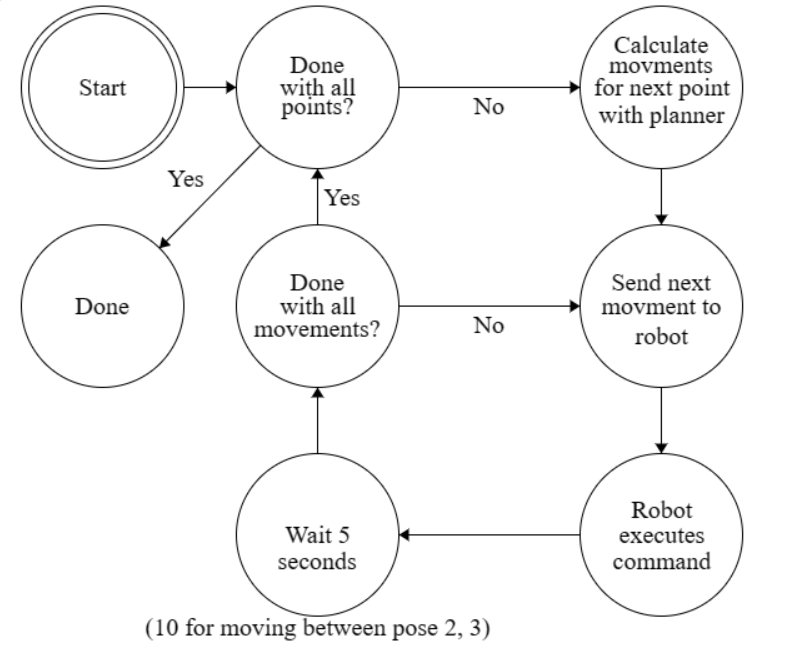
Diagram made using Finite State Machine Designer by Evan Wallace

Path Planner

The path planner was built to use the turn-go-turn procedure from the odometry model. We first gave the planner a list of the different points/poses we wanted to go to – x, y, and yaw – then sent each command to the robot, skipping any turns that were 0 degrees since that would not do anything. After a command was sent, the path planner would wait five seconds – or ten seconds for the longest movement period – and then send the next command. We later saw that the PID controller for driving forward a set distance from a wall had a blocking ToF data collection function, discussed later below, and took 15 seconds, but this was not an issue for our path planner or the commands that came after as they were queued up by ArduinoBLE, the library we used for Bluetooth and since no data was sent back to the path planner from the robot.

def run(self):
    """ navigate through all waypoints """

    i = 0

    # go through each waypoint
    while self.waypoints != []:

        # get the next target pose
        self.targetPose = self.waypoints.pop(0)

        print(waypoints[i])
        # get the new controls
        self.getNewControls()

        # send the controls to the robot
        for control in self.controls:
            self.sendControlToRobot(control)
        print()

        # update the current pose
        self.currentPose = self.targetPose

        # clear the controls
        self.controls = []

        i += 1

    print("Done!")

The commands were generated for each point that the robot was moving to and worked by getting the current position and then finding what turn, drive, and turn command was needed to get the robot to the target point using the code made for lab 10.

def normalize_angle(self, angle):
    """ Normalize the angle to be between -180 and 180 degrees """
    new_angle = angle
    while (new_angle < -180):
        new_angle = new_angle + 360
    while (new_angle >= 180):
        new_angle = new_angle - 360
    return new_angle

def computeControl(self):
    """ Get the control information based on the
      odometry motion model

      Returns:
        [delta_rot_1]: Rotation 1  (degrees)
        [delta_trans]: Translation (meters)
        [delta_rot_2]: Rotation 2  (degrees)
      """

    # first rotation comes from moving from current heading to direction of next pose
    vectorDirection = np.array([self.targetPose.x - self.currentPose.x, self.targetPose.y - self.currentPose.y])

    # get angle between vector and x-axis
    angle = np.arctan2(vectorDirection[1], vectorDirection[0])

    # convert to degrees
    angle = np.rad2deg(angle)

    # get difference between current heading and angle
    delta_rot_1 = self.normalize_angle(angle - self.currentPose.yaw)

    # get distance between current and next pose
    delta_translation = np.linalg.norm(vectorDirection)

    # get final angle change between current and angle
    delta_rot_2 = self.normalize_angle(self.targetPose.yaw - angle)

    # check if are using the travel distance or the wall distance
    if self.targetPose.endTranslation != 0:
        delta_translation = self.targetPose.endTranslation

    return delta_rot_1, delta_translation, delta_rot_2

def getNewControls(self):
    """ get the new controls for the next node """

    # get the control information
    delta_rot_1, delta_translation, delta_rot_2 = self.computeControl()

    # add to the controls
    self.controls.append(action(False, delta_rot_1, 0))
    self.controls.append(action(True, delta_translation, 1))
    self.controls.append(action(False, delta_rot_2, 2))

We used the point order given in the lab handout and added extra turns to avoid having to drive diagonally. This was because we found the ToF sensor was less accurate when going hitting a wall at an angle that was not normal to the wall. We also added the distance to the wall at a point (A) in the direction of the previous point (B) to that point (A) to use the distance to the wall if needed. The control for moving a certain distance based on how far the robot traveled, the travel distance command, was the default command sent, but if a distance to the wall was added to the point, the movement command using the distance to the wall was sent instead.

The path planner took at most 1.5 milliseconds to compute the three controls needed and on average took 1 millisecond to compute them. The output was found to be reliable by printing the commands sent to the robot and making sure they made sense when considering how the robot would need to move from one point to another, as well as getting our robot from the start to finish, and if any slight adjustments needed to be made.

The full code is below and has the waypoints/points we used listed as the poses:

class pose:
    """ used to store the pose of the robot """

    def __init__(self, x, y, yaw, id, endTranslation):

        # end translation is distance from point to wall in direction of travel from previous point

        self.x = x
        self.y = y
        self.yaw = yaw # degrees
        self.endTranslation = endTranslation/12 # in to feet
        self.id = id

    def __str__(self):
        """ String representation of the pose """
        return "Pose: x: " + str(self.x) + " y: " + str(self.y) + " yaw: " + str(self.yaw) + " id: " + str(self.id)

# starting point
pose_1 = pose(-4, -3, 90, 0, 0) # 1
pose_2 = pose(-4, -1, 0, 1, 0)

# drive though second point and third point
pose_3 = pose(2, -1, 0, 2, 0) # 2, 3

# drive to fourth point
pose_4 = pose(2, -3, -90, 3, 18) # 4

# drive to the fifth point
pose_5 = pose(5, -3, 0, 4, 18) # 5
# pose_6 = pose(5, -2, 90, 5)

# drive to through the sixth point to the seventh point
pose_7 = pose(5, 3, 90, 6, 18) # 6, 7

# drive to the eighth point
pose_8 = pose(0, 3, -180, 7, 31.5) # 8

# drive to the ninth point, the end
pose_9 = pose(0, 0, -90, 8, 0) # 9

class action:
    """ used to store information about an action to send to the robot """

    def __init__(self, is_translation, value, id):
        self.is_translation = is_translation # if is a translation or a turn
        self.value = value
        self.id = id

# does not include the first pose since is starting point
waypoints = [pose_2, pose_3, pose_4, pose_5, pose_7, pose_8, pose_9]

class planner:

    """ Planner for the robot to drive around the map and reach the goal. """

    def __init__(self, waypoints = waypoints[:], printCmds = False):
        """ Initialize the planner.

        Args:
            waypoints ([Pose]): List of waypoints to traverse
            printCmds (bool): If true, print the commands to the
                              console instead of sending them
        """
        self.waypoints = waypoints

        # initialize the current pose to the first waypoint
        self.currentPose = pose_1
        self.targetPose = None
        self.controls = []
        self.printCmds = printCmds

        # set the control constants
        self.translationKP = 0.04
        self.leftKP = 0.1
        self.rightKP = 0.04

        self.sleepTime = 5

    def normalize_angle(self, angle):
        """ Normalize the angle to be between -180 and 180 degrees """
        new_angle = angle
        while (new_angle < -180):
            new_angle = new_angle + 360
        while (new_angle >= 180):
            new_angle = new_angle - 360
        return new_angle

    def computeControl(self):
        """ Get the control information based on the
          odometry motion model
          
          Returns:
            [delta_rot_1]: Rotation 1  (degrees)
            [delta_trans]: Translation (meters)
            [delta_rot_2]: Rotation 2  (degrees)
          """

        # first rotation comes from moving from current heading to direction of next pose
        vectorDirection = np.array([self.targetPose.x - self.currentPose.x, self.targetPose.y - self.currentPose.y])

        # get angle between vector and x-axis
        angle = np.arctan2(vectorDirection[1], vectorDirection[0])

        # convert to degrees
        angle = np.rad2deg(angle)

        # get difference between current heading and angle
        delta_rot_1 = self.normalize_angle(angle - self.currentPose.yaw)

        # get distance between current and next pose
        delta_translation = np.linalg.norm(vectorDirection)

        # get final angle change between current and angle
        delta_rot_2 = self.normalize_angle(self.targetPose.yaw - angle)

        # check if are using the travel distance or the wall distance
        if self.targetPose.endTranslation != 0:
            delta_translation = self.targetPose.endTranslation

        return delta_rot_1, delta_translation, delta_rot_2
    
    def getNewControls(self):
        """ get the new controls for the next node """

        # get the control information
        delta_rot_1, delta_translation, delta_rot_2 = self.computeControl()

        # add to the controls
        self.controls.append(action(False, delta_rot_1, 0))
        self.controls.append(action(True, delta_translation, 1))
        self.controls.append(action(False, delta_rot_2, 2))

    def sendControlToRobot(self, control : action):
        """ send a control action to the robot"""

        cmdStr = ""
        cmd = None
        kp = 0
        sleepTime = self.sleepTime

        if control.is_translation:
            # convert from feet to mm
            control.value *= 304.8
            if self.targetPose.id == 2:
                sleepTime = 10

        # round to nearest mm for translation, deg for rotation
        value = int(round(control.value, 0))

        if control.is_translation:
            # set correct movement command
            kp = self.translationKP

            if self.printCmds:
                cmdStr = "CMD.POSITION_CONTROL" if self.targetPose.endTranslation != 0 else "CMD.POSITION_CONTROL_KF"
            else:
                cmd = CMD.POSITION_CONTROL if self.targetPose.endTranslation != 0 else CMD.POSITION_CONTROL_KF

        else:
            # set correct rotation command

            # left and right turns have different kp values
            kp = self.leftKP if value > 0 else self.rightKP

            if value == 0:
                # avoid sending a rotation of 0 since that does not move the robot
                return

            if self.printCmds:
                cmdStr = "CMD.TURN_LEFT" if value > 0 else "CMD.TURN_RIGHT"
            else:
                cmd = CMD.TURN_LEFT if value > 0 else CMD.TURN_RIGHT
            
        # send the command after creating the command string
        cmdString = str(kp) + "|" + str(abs(value))

        if self.printCmds:
            print("ble.send_command(" + cmdStr + ", " + '"' + cmdString + '"' + ")" )
            print("time.sleep(" + str(sleepTime) + ")")

        else:
            print("Sending command: " + cmdStr + " " + cmdString + " to robot")
            ble.send_command(cmd, cmdString)
            time.sleep(sleepTime)

    def run(self):
        """ navigate through all waypoints """

        i = 0

        # go through each waypoint
        while self.waypoints != []:

            # get the next target pose
            self.targetPose = self.waypoints.pop(0)

            print(waypoints[i])
            # get the new controls
            self.getNewControls()

            # send the controls to the robot
            for control in self.controls:
                self.sendControlToRobot(control)
            print()

            # update the current pose
            self.currentPose = self.targetPose

            # clear the controls
            self.controls = []

            i += 1

        print("Done!")

PID Controller for turning

The PID controller for turning was a P controller. This was because we had very smooth turns and we were collecting data at a very fast rate of over 100 yaw points a second from the gyroscope. We accounted for deadband in our controller by having the minimum PWM value, 100, be what the PID output was added with. The PID was scaled to be in the range of PWM values by using the Kp values of .1 and .04 for the left and right turns respectively, meaning at most a value of 118 PWM and at the least, a value of 82 PWM. Since we never turned more than 90 degrees, our lowest PWM value was predicted to be 91, which still allowed the car to turn.

We would try to get to the turn setpoint for five seconds while updating the error value with how many degrees we had traveled by using the gyroscope and integrating the change in yaw over time. After five seconds our robot would stop and be ready for the next command – matching the time delay that the path planner gave between sending each command. Our turns came out to be very accurate when run as seen in the video later below.

The code for turning right is below with comments for what differs from the turning left code:

case TURN_RIGHT:
  int Kp;
  int setpoint;
  int goal;
  float yaw_g;
  float error_turn;
  int pid_value;
  int speed;

  // for safety and deadband
  int min_speed = 100;
  int max_speed = 200;

  int pid_start, pid_end;

  // get values sent
  success = robot_cmd.get_next_value(Kp); // extract next value from the command
  if (!success) {
    return;
  }
  success = robot_cmd.get_next_value(setpoint);
  if (!success) {
    return;
  }

  // to keep track of time
  pid_start = millis();
  pid_end = pid_start;

  yaw_g = imu.get_yaw();
  goal = yaw_g - setpoint;      

  // initial error
  error_turn = setpoint;

  // 5 used to give a little room for error
  while(abs(error_turn) > 5 && (pid_end-pid_start) < 5000){

    pid_value = Kp * error_turn;

    if (pid_value > 0){
      // turn left
      speed = min_speed + pid_value;

      // check max speed
      if (speed > max_speed){
        speed = max_speed;
      }
      robot.turn_left(speed);           // is turn_right for case TURN_LEFT

    }
    else {
      // turn right
      speed = min_speed - pid_value;

      // check max speed
      if (speed > max_speed){
        speed = max_speed;
      }
      robot.turn_right(speed);           // is turn_left for case TURN_LEFT
    }

    // get new yaw
    yaw_g = imu.get_yaw();

    // update error
    error_turn = goal - yaw_g;

    // update time
    pid_end = millis(); 

  }

  // turn done, stop robot
  robot.stop();
  break;

PID controller with a Kalman Filter for driving forward

The PID controller for driving forward with the Kalman Filter was a P controller. Our movements were smooth and our ToF was collecting 10 points a second. This combined with the Kalman Filter allowed us to react quickly and made just using the P controller work well as shown later in the video below. We accounted for deadband by having an upper and lower limit using the function below to avoid having the car get stuck when the error made the PWM small. The kp value we used, .04, allowed us to scale our error values to PWM values. Our error value was the initial ToF value taken before starting to move minus the new distance from the ToF value, and then all this subtracted from the target distance that we wanted the robot to move forward. This is what lets us move a certain distance forward.

/**
 * Limit the max speed and account for deadband
*/
int limit_speed(int speed) {

  // check for max speed
  if (speed > 255) {
    return 255;
  }
  else if (speed < -255){
    return -255;
  }

  // check for deadband
  else if (speed > 0 && speed < 45) {
    return 45;
  }
  else if (speed < 0 and speed > -45) {
    return -45;
  }
  return speed;
}

We would try to get to the target point for at least 750 cycles of our while loop or until our error was less than 0. This meant that it was unbounded, but only took five or less seconds during our runs. The only case where it took more than five seconds was when traveling the longest distance between the second and third points and we had the path planner delay sending the next command for an extra five seconds.

We also considered the difference between both motors and accounted for that in our motor control code, which needed to have the PWM value scaled down to 85% before sending it to the right motor. This was also present when turning. Here is a link to Jueun’s website with the full Kalman Filter: link

////////////////////////////// Case in the case statement ///////////
case POSITION_CONTROL_KF:
  // travel a certain length using kalman filter

  // kp and target distance
  float Kp_extra_set;
  int target_d_extra_set;

  // get values
  success = robot_cmd.get_next_value(Kp_extra_set);
  if (!success)
    return;

  success = robot_cmd.get_next_value(target_d_extra_set);
  if (!success)
      return;

  // drive the robot
  P_kf(Kp_extra_set, target_d_extra_set);
  break;

//////////////////////////////////////////////////////////////////////
// KF PID Function

/**
 * PID controller for traveling distance using kalman filter from lab 7
*/
void P_kf(float Kp, int target_dist){

  // current ToF distance
  int dist;

  // Kalman filter distance
  int new_dist;

  // raw PWM value 
  int speed = 0;

  // PWM value after limiting and deadband
  int motor_input_value;

  // initial error, just has to be over 0
  int error = 1;
 
  // max number of cycles to run
  int max_arr_length = 150;

  // how many cycles have been run
  int idx = 0;

  // counter for cycles for scaling max number of cycles
  int number = 0;

  // initial distance
  int initialDist = tof.get_dist2();

  while ((idx < (max_arr_length-1)) || (error > 0)){

    // get distance from ToF sensor
    dist = tof.get_kf_dist2();

    bool prediction = false;

    if (dist == -1){ //no sensor data
      prediction = true;
    }

    if (dist != -1){ //sensor data
      prediction = false;
      new_dist = -1* kf(limit_speed(speed), dist, prediction);
    }

    // calculate error
    error = target_dist - (initialDist - new_dist);

    // calculate raw PWM value
    speed = (int)(Kp*error);

    // limit and account for deadband
    motor_input_value = limit_speed(speed);
   
    // set motor PWM and direction
    if (error > 0) {
      robot.forward(abs(motor_input_value));
    }
    if (error < 0) {
      robot.backward(abs(motor_input_value));
    }

    // if are done, stop
    if (error == 0){
      robot.stop();
    }

    // for scaling max number of cycles
    if (number%5 == 0){
      idx += 1;
    }

    number +=1; 
  }
  robot.stop();

}
view raw Lab12KfPID.md hosted with ❤ by GitHub

PID controller for driving forward to a set distance from a wall

This controller for driving forward a certain distance from a wall was the exact same as the previous controller – featuring the same kp values too and accounting for deadband– except for not using the Kalman filter, having the error instead be the target distance minus the current ToF sensor measurement, and only running for 150 cycles. However, this controller used a ToF function that was blocking, so due to the rate of the ToF being around 10 Hz, the controller would take 15 seconds to run. This did not match our path planner’s timings of 5 seconds, but this was ok as the commands that were sent were queued up on the robot and handled by the Bluetooth library used on the robot, ArduinoBLE.

The code for the blocking ToF data collection function is below:

/**
* Get data from the second ToF sensor
*/
int get_dist2(){

  // if have the distance yet
  bool have_dist2 = false;
  int dist2;
  
  // block until get measurement
  while (have_dist2 == false){
    if (distanceSensor2.checkForDataReady()){
      // data is ready
      dist2 = distanceSensor2.getDistance();
      
      // reset sensor
      distanceSensor2.clearInterrupt();
      distanceSensor2.stopRanging(); //might be able to remove
      have_dist2 = true;
      distanceSensor2.startRanging();
    }
  }
  return dist2;
}

It was able to drive the robot to the set distance from the wall very well as seen in the video later below, so we only kept it as a P controller. We did not use the Kalman Filter as it was originally made before the Kalman Filter lab and was working well.

////////////////////////////// Case in the case statement ///////////
// PID Function for set Distance from the wall
case POSITION_CONTROL:
  // drive until at a set distance from the wall

  // kp and target distance
  float Kp_set;
  int target_d;

  // get values
  success = robot_cmd.get_next_value(Kp_set);
  if (!success)
    return;

  success = robot_cmd.get_next_value(target_d);
  if (!success)
      return;

  // drive the robot
  P(Kp_set, target_d);
  break;
 
//////////////////////////////////////////////////////////////////////

/**
 * PID controller for traveling up to a certain distance from the wall
*/
void P(float Kp, int target_dist){

  // current distance
  int dist;

  // raw PWM
  int speed = 0;

  // PWM value after limiting and deadband
  int motor_input_value;

  // error
  int error;

  // max number of cycles to run, formerly used for array length
  // when sending data back to the laptop
  int max_arr_length = 150;

  // current cycle
  int idx = 0;

  while (idx < (max_arr_length-1)){

    // get new distance
    dist = tof.get_dist2();

    // calculate error
    error = dist - target_dist;

    // calculate raw PWM
    speed = (int)(Kp*error);

    // process PWM
    motor_input_value = limit_speed(speed);
    

    // set motor PWM and direction
    if (error > 0) {
      robot.forward(abs(motor_input_value));
    }
    if (error < 0) {
      robot.backward(abs(motor_input_value));
    }

    // stop if error is small enough
    if (error == 0){
      robot.stop();
    }

    // update index
    idx += 1;
  }
  robot.stop();
}

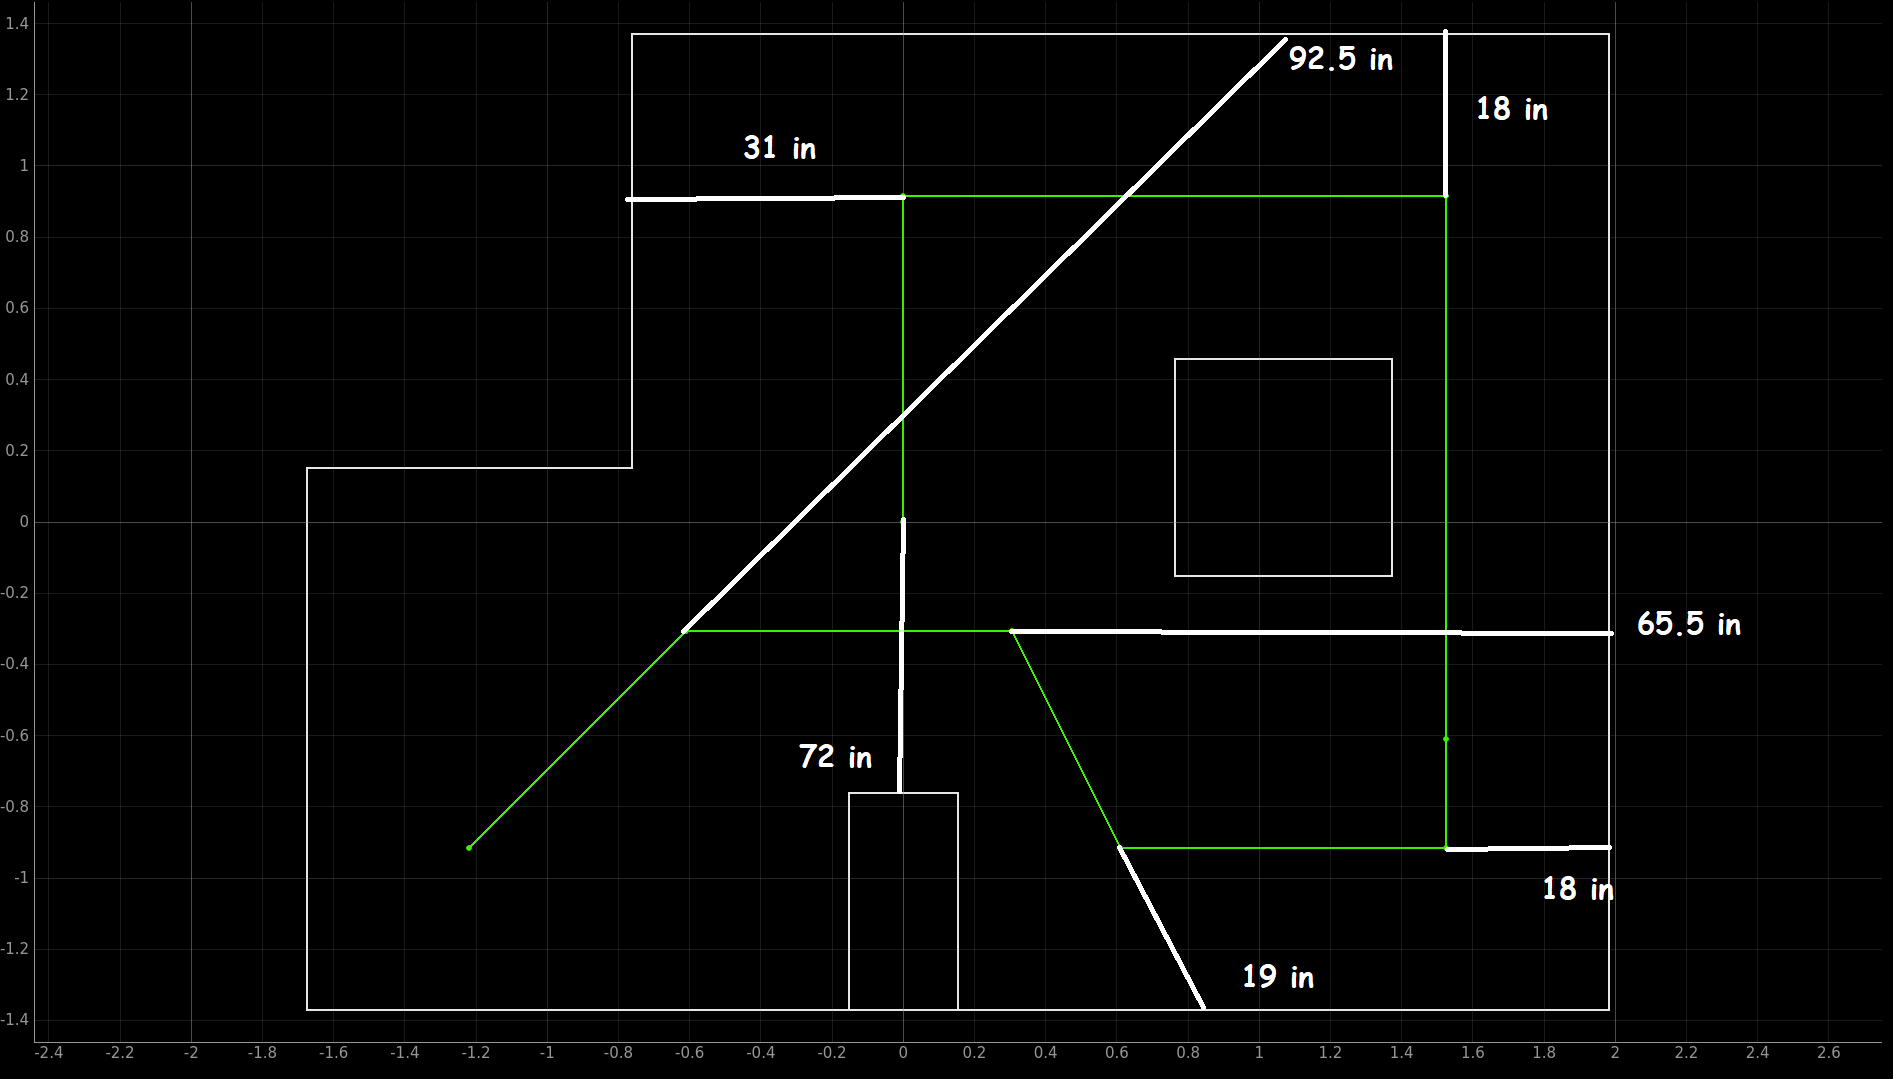
Here is a picture of the distances between points and the wall that we used on a annotated map from the lab 12 page:

Picture with map showing the different distances to the wall

Running the robot

We were able to have the robot drive to or be very close to all the waypoints. Our initial strategy was to only have the robot drive until it was a set distance from a wall or obstacle, but this was challenging if our ToF did not line up perfectly with an object and made us crash into an obstacle that was just out of line-of-sight. Then we moved to only use the travel distance – but this led to errors accumulating as we drove around. So, we went with a hybrid approach that helped us avoid issues with obstacles using the travel distance and helped realign the robot using the wall distance.

Our solution was able to work well when only dealing with walls, but even with using the travel distance, could struggle if the robot drifted and changed where the ToF was pointing, which would make the apparent travel distance seem longer or shorter than it was, making the robot overshoot or undershoot the target point/pose.

Here is the video of our best run with the screen output: